Before adding your first product, let’s get familiar with how product categories, tags, and attributes work.
Product Categories
Product categories and tags group products together, product categories can be displayed in the ‘shop’. They can be created, edited, and selected at any time. This can be done when you first create a product or come back and edit it or the category/tag specifically.
Attributes
Attributes are pieces of data that can add more technical information to a product and help users refine your catalog while browsing/searching. Attributes can be useful when you have variations of a product, such as t-shirt sizes.
For more information on product attributes, click here.
Product Types
When adding a product, the first thing to decide is what type of product it is.
- A Simple product type covers the vast majority of any products you may sell. Simple products are shipped and have no options. For example, a book.
- A Grouped product is a collection of related products that can be purchased individually and only consist of simple products. For example, a set of six drinking glasses.
- A Virtual product is one that doesn’t require shipping. For example, selling a service.
- A Downloadable product is much like a virtual one. It’s not shipping but your customers are given a downloadable file. For example, digital album, PDF magazine, or even photo.
- An External or Affiliate product is one that you list and describe on your website but is sold elsewhere.
- A Variable product is a product that has variations, each of which may have a different SKU, price, stock option, etc. For example, a t-shirt available in different colors and/or sizes.
Adding a product
Click on the relevant heading to see a video on how to add that type of product.
When adding a simple product, you can check the Virtual box in the product type panel. This removes unnecessary fields, such as dimensions. Virtual products are not shipped, therefore no shipping charges will be applied.
When adding a simple product, you can check the downloadable box in the product type panel. This adds two new fields:
- File path — Path or url to your downloadable file.
- Download limit – Limit on number of times the customer can download file. Left blank for unlimited downloads.
Variable products are a product type in WooCommerce that lets you offer a set of variations on a product, with control over prices, stock, image and more for each variation. They can be used for a product like a shirt, where you can offer a large, medium and small and in different colors.
Step 1: Set the product type
When creating a new product, set the product type to be Variable product.
Step 2: Add attributes to use for variations
When creating a new product, set the product type to be Variable product.
In the Attributes section, add attributes before creating variations — use global attributes that are site wide or define custom ones specific to a product.
Using global attributes
To use a global attribute:
- Select one from the dropdown and Add
- Choose Select all to add all attributes to the variable product (if applicable).
- Tick the Used for variations checkbox to tell WooCommerce it’s for your variations.

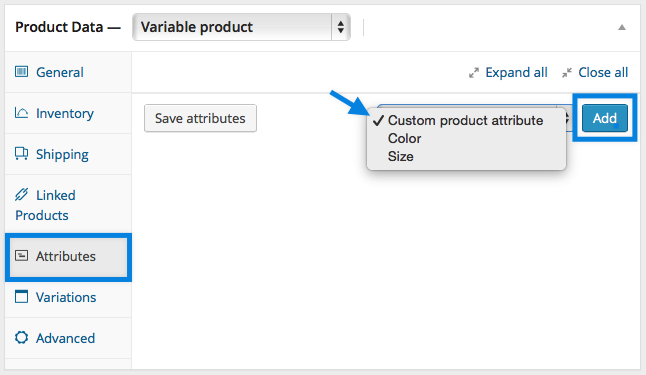
Using custom attributes specific to product
If you are adding new attributes specific to this product:
- Select Custom product attribute, and Add.
- Name the attribute (e.g. Size).
- Set values separated by a vertical pipe (e.g., small | medium | large)
- Enable the Used for variations checkbox.
- Click Save attributes.
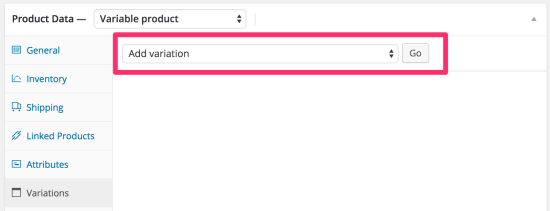
Step 3: Add variations
To add a variation, go to Variations section in the Product Data meta box.
- Select Add variation from the dropdown menu, and click Go.
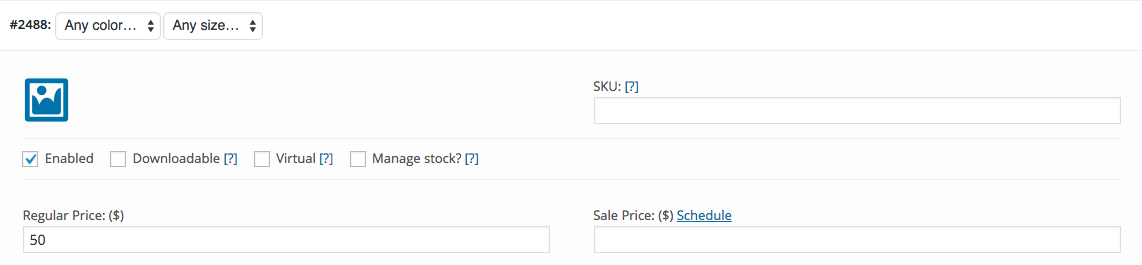
- Select attributes for your variation. To change additional data, click the triangle icon to expand the variation.

- Edit any available data. The only required field is Regular Price.
- Click Save changes.
Setting Defaults
We recommend setting defaults you prefer on variations. In the example, we have no defaults set, so users can pick any color and size right away from the product page.

If you want a certain variation already selected when a user visits the product page, you can set those. This also enables the Add to Cart button to appear automatically on variable product pages.
You can only set defaults after at least one variation has been created.
Add an image for a varation
- Expand the variation.
- Click the blue image placeholder.
- Select the image you wish to use.
- Click Save.

Linking all possible variations
You can select Create variations from all attributes to have the website create every possible combination of variations.
If your example had two attributes – color (with values blue and green) and size (with values large and small), it creates the following variations:
- Large Blue
- Large Green
- Small Blue
- Small Green
Product images
You can add a main image and a gallery of images.
Product image
The Featured Image is the main image for your product. It is displayed in your product loops (i.e., product categories, up sells, related products, etc.) and serves as the focus in the image gallery of your product details page.
Set the product image by clicking the Set product image link on the right hand panel, and either upload or select an image from the media library.
Gallery images
Product galleries display all images attached to a product through the Product Gallery meta box.
You can create a product gallery using the same method as adding a featured image, but using the Product Gallery box.
Duplicating a product
To save time, it’s possible to use a product and duplicate it to create similar products with variations and other qualities.
Go to WooCommerce > Products and look through the list for a product you wish to copy, then click Duplicate.
Deleting a product
- Go to WooCommerce > Products.
- Find the product you wish to delete.
- Hover in the area under the Product name and click Trash.